| .. | ||
| assets | ||
| autoload | ||
| doc | ||
| plugin | ||
| spec | ||
| .gitignore | ||
| .rspec | ||
| .travis.yml | ||
| CHANGELOG.md | ||
| CONTRIBUTING.md | ||
| Gemfile | ||
| Gemfile.lock | ||
| MIT-LICENSE.txt | ||
| Rakefile | ||
| README.md | ||
vim-multiple-cursors

Contents
- About
- Features
- Installation
- Quick Start
- Mapping
- Settings
- Interactions with other plugins
- Highlight
- FAQ
- Known issues
- Issue creation requirements
- Changelog
- Contributing
- Credit
###Contributors
About
There have been many attempts at bringing Sublime Text's awesome multiple selection feature into Vim, but none so far have been in my opinion a faithful port that is simplistic to use, yet powerful and intuitive enough for an existing Vim user. vim-multiple-cursors is yet another attempt at that.
It's great for quick refactoring
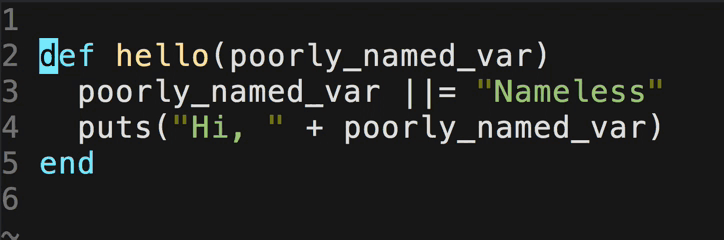
Vim command sequence: 2Gfp<C-n><C-n><C-n>cname
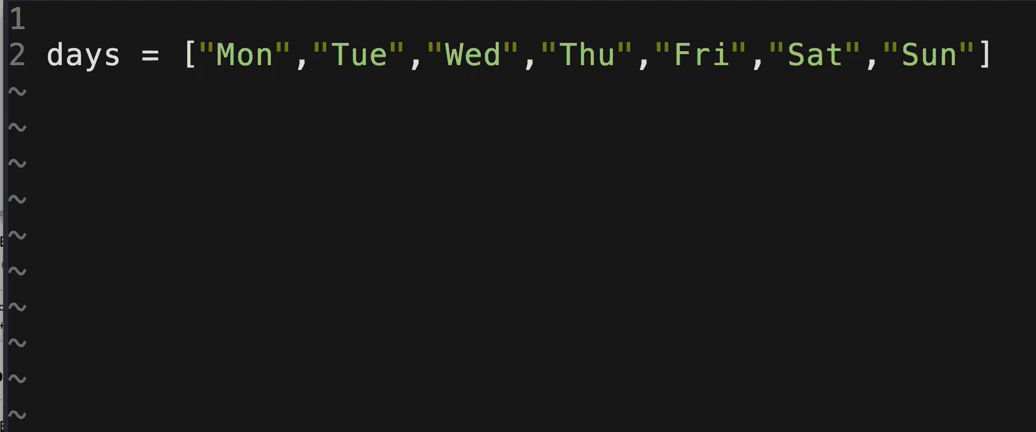
Add a cursor to each line of your visual selection

Vim command sequence: 2Gvip<C-n>i"<Right><Right><Right>",<Esc>vipJ$r]Idays = [
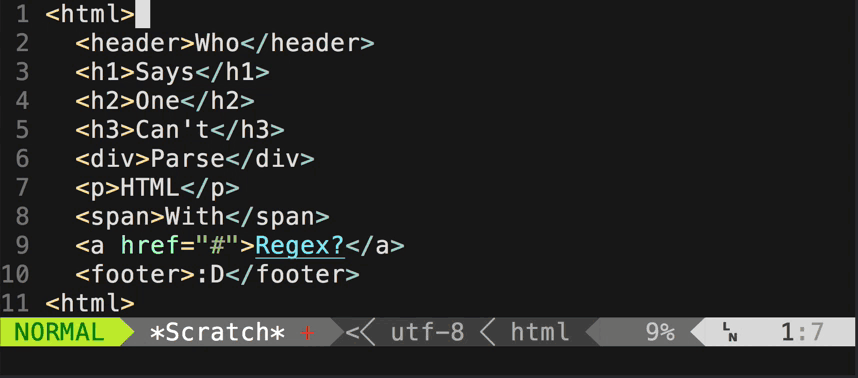
Do it backwards too! This is not just a replay of the above gif :)
Vim command sequence: 2Gdf[$r,0f,v<C-n>…<C-n>c<CR><Up><Del><Right><Right><Right><Del>
Add multiple cursors using regexes
To see what keystrokes are used for the above examples, see the wiki page.
Features
- Live update in Insert mode
- One key to rule it all! See Quick Start on what the key does in different scenarios
- Works in Normal, Insert, and Visual mode for any commands (including
multi-key commands, assuming you set
g:multicursor_insert_mapsandg:multicursor_normal_maps; see Settings below for details)
Installation
Install using Pathogen, Vundle, Neobundle, or your favorite Vim package manager. Requires vim 7.4 or later for full functionality.
Quick Start
Out of the box, all you need to know is a single key Ctrl-n. Pressing the key in Normal mode highlights the current word under the cursor in Visual mode and places a virtual cursor at the end of it. Pressing it again finds the next occurrence and places another virtual cursor at the end of the visual selection. If you select multiple lines in Visual mode, pressing the key puts a virtual cursor at every line and leaves you in Normal mode.
After you've marked all your locations with Ctrl-n, you can change the visual selection with normal Vim motion commands in Visual mode. You could go to Normal mode by pressing v and wield your motion commands there. Single key command to switch to Insert mode such as c or s from Visual mode or i, a, I, A in Normal mode should work without any issues.
At any time, you can press <Esc> to exit back to regular Vim.
Two additional keys are also mapped:
Ctrl-pin Visual mode will remove the current virtual cursor and go back to the previous virtual cursor location. This is useful if you are trigger happy withCtrl-nand accidentally went too far.Ctrl-xin Visual mode will remove the current virtual cursor and skip to the next virtual cursor location. This is useful if you don't want the current selection to be a candidate to operate on later.
You can also add multiple cursors using a regular expression. The command MultipleCursorsFind accepts a range and a pattern, and it will create a virtual cursor at the end of every match within the range. If no range is passed in, then it defaults to the entire buffer.
NOTE: If at any time you have lingering cursors on screen, you can press Ctrl-n in Normal mode and it will remove all prior cursors before starting a new one.
Mapping
Out of the box, only the single key Ctrl-n is mapped in regular Vim's Normal mode and Visual mode to provide the functionality mentioned above. Ctrl-n, Ctrl-p, Ctrl-x, and <Esc> are mapped in the special multicursor mode once you've added at least one virtual cursor to the buffer. If you don't like the plugin taking over your favorite key bindings, you can turn off the default with
let g:multi_cursor_use_default_mapping=0
You can then map the 'next', 'previous', 'skip', and 'exit' keys like the following:
" Default mapping
let g:multi_cursor_next_key='<C-n>'
let g:multi_cursor_prev_key='<C-p>'
let g:multi_cursor_skip_key='<C-x>'
let g:multi_cursor_quit_key='<Esc>'
By default, the 'next' key is also used to enter multicursor mode. If you want to use a different key to start multicursor mode than for selecting the next location, do like the following:
" Map start key separately from next key
let g:multi_cursor_start_key='<F6>'
Note that when multicursor mode is started, it selects current word with boundaries, i.e. it behaves like *. If you want to avoid word boundaries in Normal mode (as g* does) but still have old behaviour up your sleeve, you can do the following:
let g:multi_cursor_start_key='<C-n>'
let g:multi_cursor_start_word_key='g<C-n>'
In this configuration <C-n> will start multicursor mode without word boundaries (but only in Normal mode, as it does not make much sense to use it in Visual mode). Old behaviour with word boundaries is still available using g<C-n>.
IMPORTANT: Please note that currently only single keystrokes and special keys can be mapped. This means that a mapping like <Leader>n will NOT work correctly. For a list of special keys that are supported, see help :key-notation
NOTE: Please make sure to always map something to g:multi_cursor_quit_key, otherwise you'll have a tough time quitting from multicursor mode.
NOTE: Prior to version 1.3, the recommended way to map the keys is using the expression quote syntax in Vim, using something like "\<C-n>" or "\<Esc>" (see h: expr-quote). After 1.3, the recommended way is to use a raw string like above. If your key mappings don't appear to work, give the new syntax a try.
You can also map your own keys to quit, if g:multi_cursor_quit_key won't work:
let g:multi_cursor_quit_key='<C-c>'
nnoremap <C-c> :call multiple_cursors#quit()<CR>
Settings
Currently there are four additional global settings one can tweak:
g:multi_cursor_exit_from_visual_mode (Default: 1)
If set to 0, then pressing g:multi_cursor_quit_key in Visual mode will not quit and delete all existing cursors. This is useful if you want to press Escape and go back to Normal mode, and still be able to operate on all the cursors.
g:multi_cursor_exit_from_insert_mode (Default: 1)
If set to 0, then pressing g:multi_cursor_quit_key in Insert mode will not quit and delete all existing cursors. This is useful if you want to press Escape and go back to Normal mode, and still be able to operate on all the cursors.
g:multi_cursor_insert_maps (Default: {})
Any key in this map (values are ignored) will cause multi-cursor Insert mode
to pause for timeoutlen waiting for map completion just like normal vim.
Otherwise keys mapped in insert mode are ignored when multiple cursors are
active. For example, setting it to {'\':1} will make insert-mode mappings
beginning with the default leader key work in multi-cursor mode. You have to
manually set this because vim doesn't provide a way to see which keys start
mappings.
g:multi_cursor_normal_maps (Default: see below)
Default value: {'!':1, '@':1, '=':1, 'q':1, 'r':1, 't':1, 'T':1, 'y':1, '[':1, ']':1, '\':1, 'd':1, 'f':1, 'F':1, 'g':1, '"':1, 'z':1, 'c':1, 'm':1, '<':1, '>':1}
Any key in this map (values are ignored) will cause multi-cursor Normal mode
to pause for map completion just like normal vim. Otherwise keys mapped in
normal mode will "fail to replay" when multiple cursors are active. For example,
changing it from {} to {'d':1} makes normal-mode mappings beginning with d
(such as dw to delete a word) work in multi-cursor mode.
g:multi_cursor_visual_maps (Default: see below)
Default value: {'i':1, 'a':1, 'f':1, 'F':1, 't':1, 'T':1}
Any key in this map (values are ignored) will cause multi-cursor Visual mode
to pause for map completion just like normal vim. Otherwise keys mapped in
visual mode will "fail to replay" when multiple cursors are active. For example,
changing it from {} to {'i':1} makes visual-mode mappings beginning with i
(such as it to select an "inner tag block") work in multi-cursor mode.
The default list contents should work for anybody, unless they have remapped a key from an operator-pending command to a non-operator-pending command or vice versa.
These keys must be manually listed because vim doesn't provide a way to
automatically see which keys start mappings, and trying to run motion commands
such as j as if they were operator-pending commands can break things.
Interactions with other plugins
Multiple_cursors_before/Multiple_cursors_after (Default: nothing)
Other plugins may trigger on keypresses when in insert mode. These plugins generally provide a means to toggle their active state. These hooks allow the user to provide functions in their .vimrc to do this when multiple-cursor-mode is entered.
For example, if you are using Neocomplete, add this to your vimrc to prevent conflict:
" Called once right before you start selecting multiple cursors
function! Multiple_cursors_before()
  if exists(':NeoCompleteLock')==2
    exe 'NeoCompleteLock'
  endif
endfunction

" Called once only when the multiple selection is canceled (default <Esc>)
function! Multiple_cursors_after()
  if exists(':NeoCompleteUnlock')==2
    exe 'NeoCompleteUnlock'
  endif
endfunction
With this locking and unlocking we prevent neocomplete to trigger it's function calls until we are finished with multiple cursors editing.
Highlight
The plugin uses the highlight group multiple_cursors_cursor and multiple_cursors_visual to highlight the virtual cursors and their visual selections respectively. You can customize them by putting something similar like the following in your vimrc:
" Default highlighting (see help :highlight and help :highlight-link)
highlight multiple_cursors_cursor term=reverse cterm=reverse gui=reverse
highlight link multiple_cursors_visual Visual
FAQ
Q CTRL+n doesn't seem to work in gVIM?
A Try setting set selection=inclusive in your ~/.gvimrc
Q How can I select n keywords with several keystrokes? I have tried 200<C-n> which does not work.
A You can use :MultipleCursorsFind keyword. I have this binding in my vimrc:
nnoremap <silent> <M-j> :MultipleCursorsFind <C-R>/<CR>
vnoremap <silent> <M-j> :MultipleCursorsFind <C-R>/<CR>
This allows one to a) search for the keyword using * b) turn search results into cursors with Alt-j.
Known Issues
- Select mode is not implemented
Issue Creation Requirements
This is a community supported project. Contributor's time is precious and limited. To ensure your issue is not closed out of hand, please ensure it meets the requirements outlined in CONTRIBUTING.md.
Changelog
See CHANGELOG.md
Contributing
As one can see, there're still many issues to be resolved, patches and suggestions are always welcome! A list of open feature requests can be found here.
Running the test suite requires ruby and rake as well as vim of course. On Mac OS, MacVim is known to work.
Credit
Obviously inspired by Sublime Text's multiple selection feature, also encouraged by Emac's multiple cursors implementation by Magnar Sveen
